What is a Three-Way Switch? How is it wired?

A 3-way switch allows you to control an electrical fixture from two separate locations. Common scenarios would be 3-way switches located at both the top and bottom of a stairway, or having 3-way switches next to doors in a room with two entry points. The three-way switch is a variation of the standard single-pole switch, which controls a light only from one location.
A 3-way switch can also be a 3-way dimmer switch as shown below.

3-Way Dimmer switch
Three-Way Switch Screw Terminals
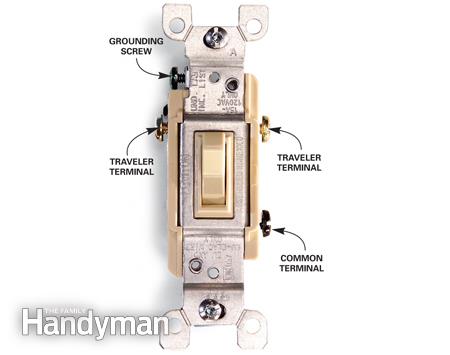
If you examine a three-way switch, you will notice several differences when compared to standard single-pole switches. First, the body of the switch will be thicker and bulkier than that of a single-pole switch. Also, the switch toggle lever on a three-way does not have the ON-OFF markings found on a single-pole switch. This is because the switch may turn the light on or off in either position, depending on the position of the other three-way switch in the pair.
The biggest difference between switch types is found in the screw terminals. While standard single-pole switches have two screw terminals on one side of the switch, plus a third green grounding screw terminal connected to the metal strap, three-way switches have three screw terminals plus a ground screw.
One of the screw terminals is a darker color than the other two terminals. The darker terminal is known as the common connection of the switch. Depending on where the switch will be in the circuit layout, the purpose of this common connection is to deliver electrical current from the power source (the circuit-breaker box) either to one of the switches or to deliver the current onward from the second switch to the light fixture.
The other two screw terminals on the switch body usually are brass-colored and are used to connect the circuit wires that run between the two three-way switches. These are known as the traveler terminals, and the wires running between the switches are known as traveler wires.
In a circuit situation, the traveler wires typically will have black and red insulation. When the switches are installed, these wires allow electrical current to pass between the switches—or they interrupt the circuit flow to turn the light fixture off. At any given moment when the light fixture is on, the power may be flowing through either the black or the red traveler wire. This will vary depending on the positions the switch toggle levers.
Three-Way Switch Wire Connections
Three-way switches have different methods of connection, depending on the brand of the switch. The switch may also have several ways to make the wire connections. All switches have screws on the side, but some also come with push-fitting holes or slots to slide the wire into. Still others come with a quick-mount, spring-loaded slot alongside the screw terminals that are designed to hold the wires in place.
Although these push fittings or slot-fittings may be the quickest way to connect a switch, this method is not recommended, as it is generally less secure. Professional electricians who want to avoid callbacks always use the screw terminal connections, which rarely come loose.
Tips for Replacing Three-Way Switches
Three-way switches are tricky to install, especially for DIYers who are replacing a bad switch. One of the most common problems is improper wiring due to connecting the circuit wires to the wrong screw terminals. It’s very easy to mix up three-way switch wiring when replacing a three-way switch, especially because in older wiring systems the standard color-coding of wires may look different than it does in newer installations.
The best way to get the wiring right is to take the time to mark the wires before you remove any from the old switch. The wire connected to the common screw terminal is the most important to mark. It must always connect to the darkest-colored terminal screw. By placing a colored piece of tape or label on the wire, it will be easy to find when you connect the new switch.
It’s also a good idea remove and reconnect one wire at a time when replacing switches. By doing this one wire at a time, you can ensure you are connecting the new switch correctly. This can sometimes be difficult, though, if the circuit wires in the wall box are too short—in this case, marking the wires is essential.

